With the introduction of the Sitecore Experience Accelerator (SXA) 1.6 we are introducing some new functionality. The last release (1.5) was mainly targeting the sharing of content and presentation within tenants. Now in 1.6 we are introducing a new component and some additional functionality to further customize the SXA experience.
Snippets
The new component which we have added, Snippets, has a lot of functionality and at the same time no functionality. That is because the functionality of the component for the end user really depends on the user or developers themselves. Snippets are a set of individual renderings combined into one group. You can design snippets directly in the Sitecore Experience Editor. Drag the snippet component on the page, after which you can drag and drop components in that snippet. The snippet will then be stored within your website, and become reusable throughout your whole site.
How are snippets different than partial layouts?
Partial layouts are also a set of renderings combined into one large group. The main differences are that partial layouts can only be used on a page once, and that the partial layout content is fixed. Snippets, however, can be used multiple times on a page and snippets use data sources for the content. This means that for each instance of a snippet you can assign different data sources and therefore show different content.
Adding new features
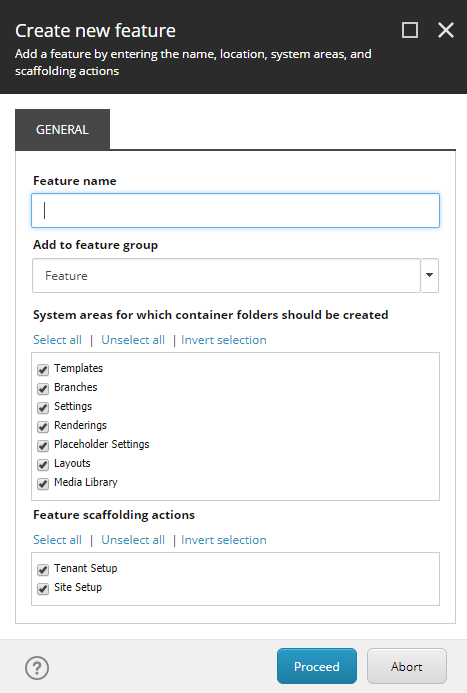
You can now add a feature using a new dialog window. This window will ask for the required information like the name of the feature and the group it belongs to, as well as any system areas where it should create folders. Finally it also gives you the option to add it to the site and tenant scaffolding process. Once you proceed it will setup all the correct folders and make it available within the scaffolding options.
In addition, it is now also possible to add a feature to a site or tenant when the site has already been created. This allows you to start with the bare minimum of features that you need and add additional features later on in the process.
Clone renderings
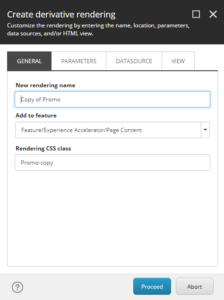
For example; let’s take a Promo component. We can find the controller rendering that is being used at /sitecore/layout/Renderings/Feature/Experience Accelerator/Page Content/Promo. If we select that item in the Content Editor and right click on it, we can then select Scripts and click Clone rendering. This will launch the “Create derivative rendering” dialog. This dialog will provide us with the options to clone the controller rendering.
We can provide some general information like the name and CSS class to use, but also which feature it needs to be available for. On the other tabs we can choose to inherit or use new rendering parameters, and inherit the existing datasource or make a copy. The final tab allows us to choose to use the default view, use a copy or assign an existing one.
Once you have created a new feature and cloned an existing rendering you are ready to add it to your site or tenant. To do so simply right-click on your site/tenant and select Scripts > Add Site/Tenant Feature. Once the feature has been added it will automatically appear in the toolbox.